Sunday, January 22, 2012

Button Tree Art

This wonderful piece of art was so simple to make. Now, I took a lot of shortcuts to make it but there are other ways to create similar looking replicas. I cheated using a Cricut Paper Cutter and black paper.
Bearcake Creations is a great blog if you are interested in fine foods, creative DIY projects, and photography tutorials. Explore the site using the labels on the right. Be sure to leave a comment or "follow" and you will absolutely brighten my day!!!
Materials:
  • Black Construction Paper
  • Buttons (I used 40 various cream and white buttons)
  • Grey Paint - of course I used by beloved gripper paint because that's what I had laying around
  • Super Glue - Sure you could use a hot glue gun - but it's just more SUPER!
  • Canvas - Mine is 11x14 inches

Directions:
Paint your canvas the color you prefer for the background. I used grey but I imagine a light blue would be lovely. Next time, I may even try pink and white sponge work done to resemble a sun set. Let paint dry and apply extra coats as needed.
I used my wonderful and FABULOUS cricut paper cutter and vinyl to create the base for the tree. Alternatively, you could us black paper and a stencil or even just paint it if you are so inclined. Using mod podge or any adhesive, attach the tree to the DRY canvas.


Arrange your buttons as you would like. I used various ivory and white buttons that are each unique - wonderfully, these are what I happen to have at home. At first I used mod podge (as seen in the image) but quickly switched to super glue for a better stick.


My amazing stepmom gave me a ton of buttons a while back but if you don't have any, they are great to buy on eBay, online discount craft stores or even Etsy.

And that's it. Let the button glue dry well before you display.


Don't feel like making this yourself? I get it! That's why I made this one for you! Buy it and anything else in the blog (minus the food sadly) in my etsy shop!
Check out my etsy shop: 
http://www.etsy.com/listing/91149908/elegant-grey-and-black-button-tree

Tuesday, January 17, 2012

Jalapeno Popper Bites


I just made these for the first time and Patrick and I instantly fell in love with these. 

They would be great for a football game, party, or just as a snack! 

I hope you try this recipe and I know you will enjoy it!


 Materials:
  • 1 Pack Crescent Rolls
  • 1-2 Fresh Jalapenos or Pickled Jalapenos
  • 1/4 Pack Cream Cheese
  • Several Pieces Cooked Bacon


Directions:
Unroll the crescents and cut them in half (they are already triangles). 
Put a small dollop of cream cheese, small pieces of bacon and some slices of jalapenos in each roll. This snack is versatile. As you can see in the picture, I didn't use bacon; I just didn't have any on hand. They were still fantastic!
Fold the roll up and seal the edges. 
Bake according to the instructions on the crescent rolls. I baked them for 10 minutes as 375.
Enjoy!

Bearcake Creations is a great blog if you are interested in fine foods, creative DIY projects, and photography tutorials. Explore the site using the labels on the right. Be sure to leave a comment or "follow" and you will absolutely brighten my day!!!

Saturday, January 14, 2012

Photography for Beginners: Histograms and EXIF Data

My motto today is: BE EXPOSED! I will talk a little about over exposure and under exposure and why you should be just plain exposed!

I want to briefly teach about histograms and EXIF Data.
Histograms are the funny graph (as shown in the image to the right) and EXIF Data is an important tool to review the settings used in any image taken.

Bearcake Creations is a great blog if you are interested in fine foods, creative DIY projects, and photography tutorials. Explore the site using the labels on the right. Be sure to leave a comment or "follow" and you will absolutely brighten my day!!!


Histograms:
While playing with my camera features, I discovered this weird graph within the display mode - the location varies based on your camera. I looked into it and learned this is called a Histogram. The purpose of this graph is to assist in creating a perfectly exposed picture.This means your photos are not too dark (under exposed) or too light and washed out (over exposed). The program running your histogram processes the amount of black and white pixels.
It graphs the tones in your image from black (on the left) to white (on the right). The left is black - this means that if the image is spiking on the left side, there are a lot of black pixels and the photo will look under exposed and dark. Conversely, if the histogram spikes on the right side your picture will be washed out and over exposed. The ideal histogram is for a small spike in the middle tapering off evenly to the left and the right.

Fun Fact: According to my new favorite photography blog (sited below), this feature is not exact. Do not entirely depend on this feature to create the perfect image but more as a frame of reference.

EXIF Data:
I am excited to use this feature as I learn more about photography. EXIF Data, which stands for ‘Exchangeable Image File’ data. This is how data is stored with each picture you take - for example the ISO, Shutter Speed, Aperture and even the type of camera used! Accessing this information is important for me because if I take a great photo I can always go back and see which settings were used.

I will explain how to access this information using a regular PC.
Open the file where you saved the picture in your computer.
Before opening the image, right click on the picture and select "Properties"
Select the "Details" tab at the top.

Enjoy exploring your new data!

If you want to access it with your camera and memory card or using a MAC computer, simply click on the sited link for further information.

Bearcake Creations is a great blog if you are interested in fine foods, creative DIY projects, and photography tutorials. Explore the site using the labels on the left and be sure to attach your email and "follow" if you want to brighten my day!

Fantastic Resources:
To gain a greater understanding of these concepts and see the work I have sited all throughout this post (as well as most pictures), visit the site below. It will teach each concept in a much more detailed lesson and has tons more to offer.

http://www.digital-photography-school.com/understanding-histograms

http://www.digital-photography-school.com/using-exif-data

Photography for Beginners: ISO, Shutter Speed and Aperture

I have been told that when learning, typically people retain 10% of what they are taught. However, if you reteach the idea, you retain 90% on the information. Therefore, I have selfishly decided to dedicate some of this blog to photography for beginners.

My birthday is coming up and my wonderful husband bought me a "fancy" camera (used on Amazon for super cheap!!). I got it a few days ago and after getting bored taking extremely amateur photos I decided to learn about the new features I have.

Tonight I have learned about ISO, Shutter Speed, and Aperture. Three words I had never heard before an hour ago. If you are an addict to "auto" mode on your camera, this post is not for you. However, if you want to learn and experiment with new features, learn away!

Turn your camera off auto mode and start taking pictures!

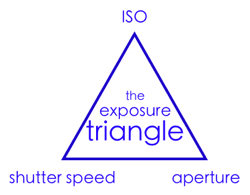
ISO, Shutter Speed and Aperture work together to create a great image in regards to exposure and lighting. These three concepts are interdependent: if you change one, it will affect the others. Hence, "The Exposure Triangle." 
Cheesy Metaphor:
Imagine your camera is like a window with shutters that open and close.

Aperture is the size of the window. If it’s bigger more light gets through and the room is brighter.

Shutter Speed is the amount of time that the shutters of the window are open. The longer you leave them open the more that comes in.

Now imagine that you’re inside the room and are wearing sunglasses (hopefully this isn’t too much of a stretch). Your eyes become desensitized to the light that comes in (it’s like a low ISO).

There are a number of ways of increasing the amount of light in the room (or at least how much it seems that there is. You could increase the time that the shutters are open (decrease shutter speed), you could increase the size of the window (increase aperture) or you could take off your sunglasses (make the ISO larger). - This metaphor (including the picture) is from the website linked at the bottom of this post. For more detailed information, refer to it.


ISO in Digital Photography: 
In short, changing ISO will impact the amount of light and graininess of the shot. Normal ISO is 100. If you take picture with say 1600 ISO, it will be grainy and more bright. Conversely, if you take a picture with lower ISO, say 80, it will be darker and smoother. 

Fun Fact: Graininess, Noise and Pixelation all mean the same thing: whether the image looks blocky. "A lot of noise" just means the picture is pixelated.

Shutter Speed in Digital Photography:
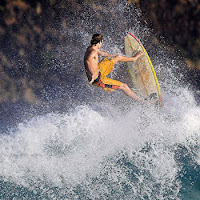
As you may guess, this just means the amount of time the shutter is open. Shutter speed is extremely important when taking motion into consideration of a picture. If you are watching someone play a sport and want a still shot without the blurriness of motion, then you need to have a quick speed. However, if you are looking for the presence of motion (if you want to take a picture of a water fall to show the flow) then you will have a slow speed. Remember, if you slow the shutter speed down, you should use a tripod so the likelihood of unwanted blur from camera shaking is avoided.

Fun Fact: Shutter Speed is always measured in seconds. More commonly it is measured in fractions of seconds such as 1/30 which is much slower than 1/1000.

Images Below: The left is FAST shutter speed. The right is SLOW shutter speed.


Aperture for Digital Photography:
Aperture helps turn a one dimensional picture into a multi-dimensional masterpiece. More simply, it is the size of the opening in the lens when a picture is taken. The depth of focus is key to understanding aperture.

Fun Facts: 
  • Aperture is measured in f-stops which are expressed like: "f/number". THINK BACKWARDS! The smaller the number, the larger the opening. f/2.8 is much MUCH larger than f/22. And therefore, f/2.8 will let in much more light. 
  • "Moving from one f-stop to the next doubles or halves the size of the amount of opening in your lens (and the amount of light getting through)" (See Attached Link for More)

Remember: "A change in shutter speed from one stop to the next doubles or halves the amount of light that gets in also – this means if you increase one and decrease the other you let the same amount of light in – very handy to keep in mind)." (See Attached Link for More)

Depth of Field (DOF):
The depth of field is the "amount of your shot that will be in focus.  
Large depth of field means that most of your image will be in focus whether it’s close to your camera or far away" (See Attached Link for More). 
Small (or shallow) depth of field "means that only part of the image will be in focus and the rest will be fuzzy" (See Attached Link for More).

Remember: Small DOF means small aperture. Large DOF means large aperture.

Images Below: 
The left image has a large DOF and a large aperture. Therefore, it is all in focus.
The right image has a small DOF and a small aperture. Therefore, just the front flowers are in focus.


To gain a greater understanding of these concepts and see the work I have sited all throughout this post (as well as most pictures), visit the site below. It will teach each concept in a much more detailed lesson and has tons more to offer.

http://www.digital-photography-school.com/digital-photography-tips-for-beginners 


Bearcake Creations is a great blog if you are interested in fine foods, creative DIY projects, and photography tutorials. Explore the site using the labels on the right. Be sure to leave a comment or "follow" and you will absolutely brighten my day!!!


Redesign an Old Bookshelf


I've had this ugly book shelf since college was just sick of it but didn't want to spend the money on a new book shelf. So I made it better, much better! 
This post is PERFECT if you have a cheap old ply-wood type book shelf driving you nuts. Or if you just want to begin 2012 with style!

I think it would also be fun to mod podge scrapbook paper or fabric to the back rather than painting a solid color. I even proposed to my husband using a cheap comic book for the back and he thought it was a little too childish for his office.  Just some alternative options to this post. I would recommend using mod podge to attach the paper and then spraying the back with an acrylic sealant.

This bookshelf is really cheap and so the technique used in this post will NOT be best for a nice, real wood book shelf. For that technique sit tight because I intend to stain my old record player table and will post once done; I will probably start that in a week or two. That will require stain and sand paper. 

This is a quick and easy fix to any CHEAP furniture. Total Cost: Under $20. Total Time: Active time: 30 minutes; Inactive Time: 60 minutes (waiting for paint to dry)

Materials:
  • A Piece of Furniture - FREE!
  • Gripper Paint - any color (I use grey). Around $5 at Home Depot
  • Spray Paint of Choice - I used teal and black. Each was $4 at Home Depot
  • Paint Brush or Foam Brush - Under $1 at Home Depot or Micheals
  • Material that can get paint on it - I favor old, broken down boxes because the paint won't stick to it (like newspaper will)


Directions:
The first step is to generously paint the intended paint surface with gripper paint. The importance of this step to to literally grip the paint to your surface. It replaces the need for sanding, Yay gripper!! Remember to paint the edges and the shelves. Allow to dry thoroughly - drying directions will be on the paint container.
Helpful Tip: While I favor foam brushes for convenience sake, don't do it! I would greatly recommend using a paint brush to apply the gripper because it will take less time and work.


 Lay the book shelf down and paint the back. Because my second color was darker, I didn't see the need to line the sides with paper to protect them. This resulted in getting teal paint on the sides that were easily covered by the black paint later. Allow the paint to thoroughly dry.


Line the interior with newspaper and using masking tape, be sure to secure the edges of the paper. I was a slacker on this step and had to repaint the teal which was an avoidable pain. Don't make my mistake and save some time. Paint the outside being and the shelves your desired color.
Let dry thoroughly and ENJOY!


Now you may be thinking "Gee Sarah, weren't there two shelves when you started this project" and that's very observant because there are. My wonderful terror of a dog mistook my shelf holder things as his toys and there are three lost in my back yard (or maybe his belly). I need to make an Ikea trip to replace them. Oh Titan. That's what I get for doing work in his yard I guess hahaha.
Titan is the GIANT monster husky/shepherd mix in the wagon. Daisy is the other dog; she is my neighbors dog. She is actually a really sweet (and patient) dog.


Bearcake Creations is a great blog if you are interested in fine foods, creative DIY projects, and photography tutorials. Explore the site using the labels on the right. Be sure to leave a comment or "follow" and you will absolutely brighten my day!!!

Coffee Filter Wreath

Make your own beautiful wreath! It is simple to create and looks elegant in any home. Mine is hanging over the fireplace; it would also look nice on a kitchen pantry door or anywhere.

For this wreath I used tan coffee filters, which can be found in any grocery store, but you can also use white coffee filters for a different look!

I have been complimented a TON on this wreath and I think it's because this wreath is so versatile for any home. 

It was a great, quick paced project I did just sitting and watching TV with my husband.


Materials:
  • 1 Pack tan or white coffee filters - About $1 at the grocery store
  • 1 Straw Wreath or Styrofoam wreath - $4 at Hobby Lobby
  • Chocolate Ribbon - $10 at Hobby Lobby but you can buy MUCH cheaper ribbon for around $1-3. 
  • Sewing Pins or Straight Pins - $4 at Hobby Lobby for about 750. Just check the sewing section for pins and buy the best deal.
Helpful Tips Before You Start:
Re-purpose a spray bottle lid as a thimble
1. I bought a straw wreath because it happened to be cheaper than the Styrofoam but either will work great for this purpose. Remember, if using the straw wreath, DO NOT UNWRAP IT! I've heard of this happening and it will just create a HUGE mess! Just leave it in the plastic to begin.
2. If you don't have straight pins or just plain don't want to buy them, don't. The pins can be replaced by gluing with a hot glue gun or even mod podge. I used straight pins to ensure the filters do not fall off.
3. If you choose to use pins, your fingers will quickly hate you. Thanks to the craftiness of my husband I used a spray bottle lid as a thimble since I don't own a real thimble. This is in the background (circled in red) in the image to the left.

Directions:
Attach to the wreath with pin
Crinkle in the middle
Begin by taking one coffee filter and crinkle the center. It doesn't matter how you choose to fold the middle - you can't mess this up. Once you crumble the middle and are happy with the shape of this filter attach it to the straw wreath using a straight pin.
 

 Just begin added them and before long you will be almost done! I was going slowly while relaxing and the whole wreath probably took 45 minutes.

Attach the bow
 Using your ribbon of choice, tie a bow and attach to your incredible, new wreath. I used a long nail to attach my bow because I didn't want to smush the coffee filters and this was the only thing in my house long enough that would work. I did this by strategically placing the nail through a back layer of the bow so it cannot be seen when looking at the wreath. Then I fluffed the filters near the bow and adjusted them as necessary. 
Attach the top ribbon


Cut ribbon for the top and simply attach it to the wreath using straight pins. I attached quite a bit of pins to ensure that the ribbon is secure.  

You are done!  Enjoy your new and wonderful wreath! 


Don't feel like making this yourself? I get it! That's why I made this one for you! Buy it and anything else in the blog (minus the food sadly) in my etsy shop!
Check out my etsy shop: 
http://www.etsy.com/listing/89949314/20-inch-tan-wreath-with-chocolate-brown


Bearcake Creations is a great blog if you are interested in fine foods, creative DIY projects, and photography tutorials. Explore the site using the labels on the right. Be sure to leave a comment or "follow" and you will absolutely brighten my day!!!

Friday, January 13, 2012

Banana Caramel Cream Pie with Homemade Whipped Cream

This pie is delicious! While, I'm completely biased that you ought to try this ENTIRE recipe, there are a few cheats to get similar flavors more easily: 1. Store bought crust
2. Instant banana pudding
3. Store bought whipped cream
While these tricks will help you save time, they will not compare to the true recipe! Either way, you won't be disappointed!
Ingredients:
  • Easy as Pie Crust: Pate Sucree (sweet dough), COOKED AND COOLED - See the Easy As Pie CRUST recipe under the Food label on this blog. The Pate Sucree variation is at the bottom of the post.
  • Salted Caramel Sauce - See the Homemade Salted Caramel Sauce recipe under the Food  label on this blog. 
Custard Pie Filling:
  • 1/2 cup Sugar
  • 1/3 tsp Salt
  • 2 tbl Cornstarch
  • 1 tbl Flour
  • 2 1/2 cups whole milk
  • 2 egg yolks
  • 1 tbl butter
  • 1 tsp vanilla extract
  • 3 Bananas  
Whipped Cream Topping:
  • 1 cup Heavy Whipping Cream
  • 2 tbl powdered sugar (or regular sugar)
  • 1 tsp vanilla extract
Directions for Custard Filling:


Begin by preparing. In a large bowl, fill it 1/2 way with ice. Take a smaller bowl and put in inside this one. Top this contraption with a strainer and stick the three dishes in the freezer.

In a larger pot, mix together sugar, cornstarch, and flour. Over medium-low heat, slowly whisk in the milk. Stirring this occasionally until it begins to boil.
Helpful Tip: The recipe calls for a "heavy-bottomed bowl" which I don't have, so I just set the pot over a cast-iron pan so the heat was evenly distributed.
 

In a small bowl, mix the two egg yolks.
Once the custard begins to boil, take 1/2 a cup of the custard and slowly add to the yolks - Be sure to whisk while adding the warm mixture. Then pour the eggs into the large pot while whisking.

This technique is called tempering. The purpose is to warm the temperature of the eggs before adding them to the mixture so the eggs don't scramble and cook. This step is crucial!


Pour this mixture, once the eggs have been added, through your freezer-contraption. Using a rubber spatula to help push the custard through the strainer will help expedite this process. Dice one banana and stir into the custard.
Allow this mixture to cool down. 


Meanwhile, slice one banana and fill a layer in the bottom of the pie crust. This will prevent a soggy crust later! Drizzle the salted caramel sauce over the bananas. 


Add the cooled custard to the pie dish and top with remaining banana, sliced. 
Add another drizzle of caramel and put in fridge to allow the custard to set, about to hours (but honestly we waited like 30 minutes!). Top with whipped cream and enjoy a taste of heaven! We even drizzle MORE caramel on top!

Directions for Whipped Cream: 
Place a large glass bowl and your whisk (or attachments for you egg beater) in the freezer and wait until extremely cold! 


Add the cream, sugar, and vanilla extract to your VERY cold bowl. Whisk or mix until you have stiff peaks.
This just means that when you pull the whisks out, the whipped cream on the end doesn't droop and fall down. They should remain straight out (or stiff).


For this and other great recipes:
http://www.cookingchanneltv.com/recipes/kelsey-nixon/banana-caramel-cream-pie-recipe/index.html


Bearcake Creations is a great blog if you are interested in fine foods, creative DIY projects, and photography tutorials. Explore the site using the labels on the right. Be sure to leave a comment or "follow" and you will absolutely brighten my day!!!

Homemade Salted Caramel Sauce

The best part of this recipe: you don't even touch it for most of the process!

This home made salted caramel sauce is incredible!

I made this to top and layer in a banana caramel pie and it was just delicious. Of course, this recipe came from Kelsey's Essentials - you know I LOVE her show. 

It would be excellent over ice cream, chocolate cake, or any favored dessert.  


Ingredients:
  • 1 cup Sugar
  • 1/4 cup Water
  • 3/4 cup heavy cream
  • 3 1/2 tablespoons unsalted butter
  • 1 tsp kosher salt
Directions:
Combine the sugar and water in a pot over medium-high heat. Stirring occasionally, until the sugar dissolves. 
Once the sugar is dissolved, DO NOT STIR AGAIN. Turn the heat up slightly and do not stir. 

 After 5-6 minutes, the mixture will begin to turn auburn. 
Note: I didn't turn the heat up enough and it took almost 15 minutes to turn colors and mine came out perfectly! This recipe is too easy and you can't mess it up!
When it becomes the color shown, you are ready to finish it!


Remove the mixture from the heat and slowly pour in the heavy whipping cream while stirring with a whisk.
  

Add the butter and salt, continue stirring. 


Note: If there is crystallized sugar stuck to the sides of your pan, don't worry! It's okay but just soak before washing. ; )


Bearcake Creations is a great blog if you are interested in fine foods, creative DIY projects, and photography tutorials. Explore the site using the labels on the right. Be sure to leave a comment or "follow" and you will absolutely brighten my day!!!

Enjoy your AMAZING homemade caramel sauce! 
For this and more amazing recipes: 
http://www.cookingchanneltv.com/recipes/kelsey-nixon/banana-caramel-cream-pie-recipe/index.html