Monday, February 13, 2012

Simple Slow Cooker Jambalaya


I'm about to start a new job and am about to be adding more slow-cooker recipes as a result. This is the first. It is easy and delicious slow cooker jambalaya. My husband greatly enjoyed this recipe and I hope you will as well.


Ingredients:
2 boneless, skinless chicken breasts, diced
1 lb smoked sausage, cut into slices
1 large onion, diced
1 large pepper - green, red or orange, diced
3 stalks celery, diced
5 cloves garlic, minced
1 can (28 ounces) diced tomatoes with juice
2 cups low sodium chicken broth
1 tablespoon Cajun or Creole spices
1 teaspoon dried thyme
1 teaspoon dried oregano
1 lb medium raw shrimp, peeled and deveined
1 3/4 cup rice

 Directions:
Combine in your large slow cooker: chicken, sausage, onion, pepper, celery, garlic, canned tomatoes, chicken broth, Cajun spice mix, thyme, and oregano. Cook on low for 5 hours.


Add shrimp and rice; raise heat to high and cook for 30 more minutes. Enjoy!

Baked Crab Rangoons with Sweet and Sour Sauce


I am obsessed with crab rangoons and allow my addiction to dictate which Chinese restaurant we order from. Now you can make them at home. For longer than I care to admit, I have been trying various recipes and have finally cracked the code! This is the perfect crab rangoon with homemade sweet and sour sauce! I know this will become a fast favorite in your home!


Crab Rangoons:
Ingredients:
2 tablespoons greek yogurt or sour cream
8 oz cream cheese, softened 1 scallion, thinly sliced
2 garlic cloves, minced
1/2 teaspoon ground ginger
1 teaspoon soy sauce
1/2 teaspoon sugar
1 tablespoon crab meat, the original recipe called for 1/2 cup but I prefer less
wonton wrappers: which can be found in most grocery stores usually in the produce section 
1 egg - for eggwash

Directions:
In a mixing bowl, combine all ingredients minus wonton wrappers.
Prepare your filling station: the filling, a damp towel, spoon to scoop, small bowl of water, and a baking sheet to place filled rangoons.

Preheat oven to 350.

Fill each wrapper with about 1 tbls of mix and brush water onto 2 corner with the tip of your finger. Seal the wontons and place on your baking sheet. As you can see, the first six I made were fancy and then the rest were just folded into triangles. Being fancy took about 40 times the effort.

FREEZER DIRECTIONS:At this stage it is possible to freeze if you'd like to save some. I usually pull out what I'm using that night and freeze the rest. The way to freeze them is to lay them on a cookie sheet and stick it in the freezer until they are fully frozen. At this point you can place them into a zip-lock bag and keep frozen until your next at-home Chinese night.


For the ones you are eating now, brush with egg wash (1 egg mixed with 1 tablespoon water). This step is optional and I usually skip it. You could also simply spray with olive oil cooking spray.

Bake for 18-20 minutes or until golden-brown. 


Sweet and Sour Sauce: 
58 Calories total Serves 20

Ingredients:
1/2 cup Brown Sugar
1/4 cup White Sugar
1/2 cup Water
1/4 cup Ketchup
1/3 cup White Vinegar
1/4 cup Soy Sauce
1 tablespoon Cornstarch
Directions:
Mix all ingredients in a small sauce pan.
Heat over medium heat until boiling, stirring constantly.

Reduce heat and let simmer until ready to eat.

*If too thin, add more cornstarch: whisk 1 tablespoon cornstarch and 1 tablespoon water in a small bowl then add to sauce.

Bang Bang Shrimp

I'm from Tallahassee and before each home Florida State University football game there is a Down Town Get Down. It's a great way for the town to get hyped up for the game; there is good food, great drinks, live music - good times for all. My mom's and my absolute favorite thing is to get Bang Bang Shrimp from the Bonefish food truck! Here is an incredible copy-cat recipe that I have adapted into perfection. Below are instructions for either deep-frying or stove-top frying. Enjoy!

Bang Bang Shrimp Recipe:
Ingredients:

1 pound shrimp, raw, peeled, and deveined

Sauce:
1/2 cup mayo
5 tsp. chili garlic sauce
1 tsp. granulated sugar
1 tsp. rice vinegar
2 Drops Sirachi, to taste
2-3 Drops lemon juice, to taste

Egg mixture:
1 egg
1 cup milk

Breading:
3/4 cup flour
3/4 cup panko
1 tsp. Salt
3/4 tsp. black pepper
1/2 tsp. onion powder
3/4 tsp. garlic powder


Cooking Directions:
In a shallow bowl, mix the egg and milk, set aside. 

In a separate dish, I used a pie pan, combine the breading ingredients and stir well to combine.

Dip the shrimp in the breading, followed by egg, and then back in the breading. Set on a baking sheet. Continue until all shrimp are coated. Refrigerate for 30 minutes. This step is important because the breading needs to set. Leave the tails on and they will act as a dipping handle!

In a small bowl, mix all of the sauce ingredients together and set aside, covered.

DEEP FRY:
Place 6 shrimp in the fryer at a time (unless you have a large fryer) and wait until they float horizontally on the top.

PAN FRY:
Meanwhile heat the oil in a nonstick skillet. Once hot, add 6-7 shrimp at a time until golden on one side, slip. Once both sides are golden remove and place on paper towel to dry.
Add six shrimp at a time to a mixing bowl with about a tablespoon of sauce. Once coated, remove and add more shrimp and sauce. I used a rubber spatula to stir mix.
Serve hot on a bed of lettuce, top with green onion if desired.
Enjoy your incredible new recipe!

Two FREE Photo Editing Programs

I have two programs that I use for photo editing and they are both FREE! Why pay $800 for programs? These two programs will make the most plain images pop and help to create a professional looks easily.

My two programs of choice are Photoscape and Picasa. 

Picasa by Google Photo Editing Program:
Picasa is a program my dad told me about. It's perfect for amateur photo editors with over 20 programmed image editing options from sepia and adding boarders to vintage and more challenging looks. This program is the most user-friendly out there and even has my favorite option of "I'm Feeling Lucky" where it auto-edits the pictures. 
Another amazing feature is that it automatically pulls ALL of the images from the various files on your c-drive so you can access them easily. As you add images to your computer it will auto update too! It is wonderful! 
Download picasa here: http://picasa.google.com/

Picasa: "I'm Feeling Lucky" Button crisped up the colors with ONE CLICK
PhotoScape Photo Editing:
Photoscape is a fabulous program that my sister told me about. You should check out her blog for a hilarious spin on craft ideas inspired by Pinterest: http://powningpinterest.blogspot.com/

Photoscape is great for those who know a little more than first-time users. It doesn't have pre-programmed buttons and is more manual. This is a plus because it allows you to make more changes and broadens your horizons!
Download Photoscape here: http://www.photoscape.org/ps/main/download.php

Below is an image my sister edited using photoscape and yes it is PERFECTION!
PhotoScape: This images is just one example of the images YOU can create.

I hope you enjoy playing around with your new programs! Please leave comments on other FREE photo-editing programs! 

Bearcake Creations is a great blog if you are interested in fine foods, creative DIY projects, and photography tutorials. Explore the site using the labels on the right. Be sure to leave a comment or "follow" and you will absolutely brighten my day!!!

Sunday, January 22, 2012

Button Tree Art

This wonderful piece of art was so simple to make. Now, I took a lot of shortcuts to make it but there are other ways to create similar looking replicas. I cheated using a Cricut Paper Cutter and black paper.
Bearcake Creations is a great blog if you are interested in fine foods, creative DIY projects, and photography tutorials. Explore the site using the labels on the right. Be sure to leave a comment or "follow" and you will absolutely brighten my day!!!
Materials:
  • Black Construction Paper
  • Buttons (I used 40 various cream and white buttons)
  • Grey Paint - of course I used by beloved gripper paint because that's what I had laying around
  • Super Glue - Sure you could use a hot glue gun - but it's just more SUPER!
  • Canvas - Mine is 11x14 inches

Directions:
Paint your canvas the color you prefer for the background. I used grey but I imagine a light blue would be lovely. Next time, I may even try pink and white sponge work done to resemble a sun set. Let paint dry and apply extra coats as needed.
I used my wonderful and FABULOUS cricut paper cutter and vinyl to create the base for the tree. Alternatively, you could us black paper and a stencil or even just paint it if you are so inclined. Using mod podge or any adhesive, attach the tree to the DRY canvas.


Arrange your buttons as you would like. I used various ivory and white buttons that are each unique - wonderfully, these are what I happen to have at home. At first I used mod podge (as seen in the image) but quickly switched to super glue for a better stick.


My amazing stepmom gave me a ton of buttons a while back but if you don't have any, they are great to buy on eBay, online discount craft stores or even Etsy.

And that's it. Let the button glue dry well before you display.


Don't feel like making this yourself? I get it! That's why I made this one for you! Buy it and anything else in the blog (minus the food sadly) in my etsy shop!
Check out my etsy shop: 
http://www.etsy.com/listing/91149908/elegant-grey-and-black-button-tree

Tuesday, January 17, 2012

Jalapeno Popper Bites


I just made these for the first time and Patrick and I instantly fell in love with these. 

They would be great for a football game, party, or just as a snack! 

I hope you try this recipe and I know you will enjoy it!


 Materials:
  • 1 Pack Crescent Rolls
  • 1-2 Fresh Jalapenos or Pickled Jalapenos
  • 1/4 Pack Cream Cheese
  • Several Pieces Cooked Bacon


Directions:
Unroll the crescents and cut them in half (they are already triangles). 
Put a small dollop of cream cheese, small pieces of bacon and some slices of jalapenos in each roll. This snack is versatile. As you can see in the picture, I didn't use bacon; I just didn't have any on hand. They were still fantastic!
Fold the roll up and seal the edges. 
Bake according to the instructions on the crescent rolls. I baked them for 10 minutes as 375.
Enjoy!

Bearcake Creations is a great blog if you are interested in fine foods, creative DIY projects, and photography tutorials. Explore the site using the labels on the right. Be sure to leave a comment or "follow" and you will absolutely brighten my day!!!

Saturday, January 14, 2012

Photography for Beginners: Histograms and EXIF Data

My motto today is: BE EXPOSED! I will talk a little about over exposure and under exposure and why you should be just plain exposed!

I want to briefly teach about histograms and EXIF Data.
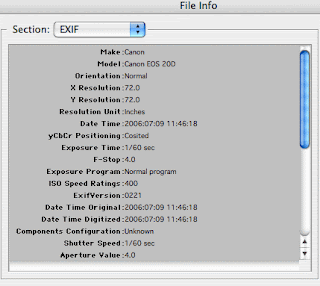
Histograms are the funny graph (as shown in the image to the right) and EXIF Data is an important tool to review the settings used in any image taken.

Bearcake Creations is a great blog if you are interested in fine foods, creative DIY projects, and photography tutorials. Explore the site using the labels on the right. Be sure to leave a comment or "follow" and you will absolutely brighten my day!!!


Histograms:
While playing with my camera features, I discovered this weird graph within the display mode - the location varies based on your camera. I looked into it and learned this is called a Histogram. The purpose of this graph is to assist in creating a perfectly exposed picture.This means your photos are not too dark (under exposed) or too light and washed out (over exposed). The program running your histogram processes the amount of black and white pixels.
It graphs the tones in your image from black (on the left) to white (on the right). The left is black - this means that if the image is spiking on the left side, there are a lot of black pixels and the photo will look under exposed and dark. Conversely, if the histogram spikes on the right side your picture will be washed out and over exposed. The ideal histogram is for a small spike in the middle tapering off evenly to the left and the right.

Fun Fact: According to my new favorite photography blog (sited below), this feature is not exact. Do not entirely depend on this feature to create the perfect image but more as a frame of reference.

EXIF Data:
I am excited to use this feature as I learn more about photography. EXIF Data, which stands for ‘Exchangeable Image File’ data. This is how data is stored with each picture you take - for example the ISO, Shutter Speed, Aperture and even the type of camera used! Accessing this information is important for me because if I take a great photo I can always go back and see which settings were used.

I will explain how to access this information using a regular PC.
Open the file where you saved the picture in your computer.
Before opening the image, right click on the picture and select "Properties"
Select the "Details" tab at the top.

Enjoy exploring your new data!

If you want to access it with your camera and memory card or using a MAC computer, simply click on the sited link for further information.

Bearcake Creations is a great blog if you are interested in fine foods, creative DIY projects, and photography tutorials. Explore the site using the labels on the left and be sure to attach your email and "follow" if you want to brighten my day!

Fantastic Resources:
To gain a greater understanding of these concepts and see the work I have sited all throughout this post (as well as most pictures), visit the site below. It will teach each concept in a much more detailed lesson and has tons more to offer.

http://www.digital-photography-school.com/understanding-histograms

http://www.digital-photography-school.com/using-exif-data