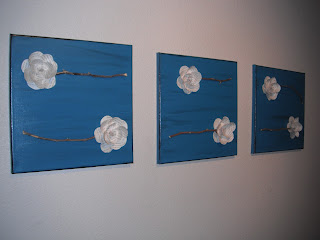
I MADE THESE!! I cannot believe it because words like "hand painted" or "sewing machine" scare me. Don't worry, no sewing machine was used for this piece.
I was unsure if I would be able to make this and it turn out right - but it did!!!!
I just love this and I promise that it is really easy and versatile.
Materials:
- 3 Canvases - Around 5.99 each or just wait for a sale and buy them in a pack. I got them for around $2 each at Micheal's on sale.
The black edges are just wonderful - Grey Paint (of course I used my gripper paint) - Grey Spray Paint at Home Depot is around $3; I just used what is at home
- Black Paint, stainer, or what is on hand - Black Spray Paint at Home Depot for $1 (which is the regular price)
- Teal Paint - At Home Depot for $5; I just used Spray Paint
- Six Sticks - FREE
- Six Paper Flowers - See the Paper Flower Tutorial in the DIY Projects section on this blog
- Foam Brushes - Under $1 each - You can also use a paint brush, but you will need one foam brush.
- Tacky Glue or hot glue. Something that will dry clear. - About $4
 Painting The Canvas: Obviously, this is the first part of this project. Painting is done in four easy stages: grey, black, teal, black edges.
 Stage One: Grey: Paint each canvas grey - I recommend using to coats. Wait to completely dry.
 Stage Two: Black Streaks: Using black paint and a paint brush or foam brush, create the streaking effect on the piece. I used a stainer that was out for another project but black paint or black spray paint can be used as well. If using spray paint, just spray on a paper plate or elsewhere and using a foam brush, apply the paint.
  |
| QUICKLY Stroke with Foam Brush |
 |
| Paint the Canvas Teal |
 |
| Apply at an angle |
Okay so back to the tutorial. I used my fancy $1 spray paint. Like always, I was painting on my favorite old box as my work space and simply sprayed the paint on the box (a paper plate would work here as well). Lightly (LITTLE PAINT IS KEY - You can always add more), dip the foam in your black paint - just the tip (insert pervy jokes here - CHRISTIE!) - and the angle the foam brush along the edges of your canvas creating a faint black outline. Let the completely dry while you search for sticks.
Adding the Rest:
 |
| Glue on Sticks |
 |
| Glue on Flowers |
Don't feel like making your own? I get it! That's why you can buy these in my etsy store:
http://www.etsy.com/listing/89805426/set-of-three-hand-painted-teal-flower
Bearcake Creations is a great blog if you are interested in fine foods, creative DIY projects, and photography tutorials. Explore the site using the labels on the right. Be sure to leave a comment or "follow" and you will absolutely brighten my day!!!


No comments:
Post a Comment