My motto today is: BE EXPOSED! I will talk a little about over exposure and under exposure and why you should be just plain exposed!
I want to briefly teach about histograms and EXIF Data.
Histograms are the funny graph (as shown in the image to the right) and EXIF Data is an important tool to review the settings used in any image taken.
Bearcake Creations is a great blog if you are interested in fine foods, creative DIY projects, and photography tutorials. Explore the site using the labels on the right. Be sure to leave a comment or "follow" and you will absolutely brighten my day!!!
Bearcake Creations is a great blog if you are interested in fine foods, creative DIY projects, and photography tutorials. Explore the site using the labels on the right. Be sure to leave a comment or "follow" and you will absolutely brighten my day!!!
While playing with my camera features, I discovered this weird graph within the display mode - the location varies based on your camera. I looked into it and learned this is called a Histogram. The purpose of this graph is to assist in creating a perfectly exposed picture.This means your photos are not too dark (under exposed) or too light and washed out (over exposed). The program running your histogram processes the amount of black and white pixels.
It graphs the tones in your image from black (on the left) to white (on the right). The left is black - this means that if the image is spiking on the left side, there are a lot of black pixels and the photo will look under exposed and dark. Conversely, if the histogram spikes on the right side your picture will be washed out and over exposed. The ideal histogram is for a small spike in the middle tapering off evenly to the left and the right.
Fun Fact: According to my new favorite photography blog (sited below), this feature is not exact. Do not entirely depend on this feature to create the perfect image but more as a frame of reference.
 EXIF Data:
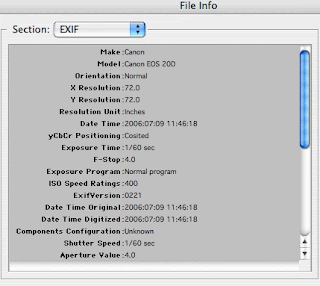
I am excited to use this feature as I learn more about photography. EXIF Data, which stands for ‘Exchangeable Image File’ data. This is how data is stored with each picture you take - for example the ISO, Shutter Speed, Aperture and even the type of camera used! Accessing this information is important for me because if I take a great photo I can always go back and see which settings were used.
I will explain how to access this information using a regular PC.
Open the file where you saved the picture in your computer.
Before opening the image, right click on the picture and select "Properties"
Select the "Details" tab at the top.
Enjoy exploring your new data!
If you want to access it with your camera and memory card or using a MAC computer, simply click on the sited link for further information.
Bearcake Creations is a great blog if you are interested in fine foods, creative DIY projects, and photography tutorials. Explore the site using the labels on the left and be sure to attach your email and "follow" if you want to brighten my day!
Fantastic Resources:
It graphs the tones in your image from black (on the left) to white (on the right). The left is black - this means that if the image is spiking on the left side, there are a lot of black pixels and the photo will look under exposed and dark. Conversely, if the histogram spikes on the right side your picture will be washed out and over exposed. The ideal histogram is for a small spike in the middle tapering off evenly to the left and the right.
Fun Fact: According to my new favorite photography blog (sited below), this feature is not exact. Do not entirely depend on this feature to create the perfect image but more as a frame of reference.
 EXIF Data:
I am excited to use this feature as I learn more about photography. EXIF Data, which stands for ‘Exchangeable Image File’ data. This is how data is stored with each picture you take - for example the ISO, Shutter Speed, Aperture and even the type of camera used! Accessing this information is important for me because if I take a great photo I can always go back and see which settings were used.
I will explain how to access this information using a regular PC.
Open the file where you saved the picture in your computer.
Before opening the image, right click on the picture and select "Properties"
Select the "Details" tab at the top.
Enjoy exploring your new data!
If you want to access it with your camera and memory card or using a MAC computer, simply click on the sited link for further information.
Bearcake Creations is a great blog if you are interested in fine foods, creative DIY projects, and photography tutorials. Explore the site using the labels on the left and be sure to attach your email and "follow" if you want to brighten my day!
Fantastic Resources:
To gain a greater understanding of these concepts and see the work I have sited all throughout this post (as well as most pictures), visit the site below. It will teach each concept in a much more detailed lesson and has tons more to offer.
http://www.digital-photography-school.com/understanding-histograms
http://www.digital-photography-school.com/using-exif-data


No comments:
Post a Comment