Showing posts with label Photography Tutorials. Show all posts

Monday, February 13, 2012

Two FREE Photo Editing Programs

I have two programs that I use for photo editing and they are both FREE! Why pay $800 for programs? These two programs will make the most plain images pop and help to create a professional looks easily.

My two programs of choice are Photoscape and Picasa. 

Picasa by Google Photo Editing Program:
Picasa is a program my dad told me about. It's perfect for amateur photo editors with over 20 programmed image editing options from sepia and adding boarders to vintage and more challenging looks. This program is the most user-friendly out there and even has my favorite option of "I'm Feeling Lucky" where it auto-edits the pictures. 
Another amazing feature is that it automatically pulls ALL of the images from the various files on your c-drive so you can access them easily. As you add images to your computer it will auto update too! It is wonderful! 
Download picasa here: http://picasa.google.com/

Picasa: "I'm Feeling Lucky" Button crisped up the colors with ONE CLICK
PhotoScape Photo Editing:
Photoscape is a fabulous program that my sister told me about. You should check out her blog for a hilarious spin on craft ideas inspired by Pinterest: http://powningpinterest.blogspot.com/

Photoscape is great for those who know a little more than first-time users. It doesn't have pre-programmed buttons and is more manual. This is a plus because it allows you to make more changes and broadens your horizons!
Download Photoscape here: http://www.photoscape.org/ps/main/download.php

Below is an image my sister edited using photoscape and yes it is PERFECTION!
PhotoScape: This images is just one example of the images YOU can create.

I hope you enjoy playing around with your new programs! Please leave comments on other FREE photo-editing programs! 

Bearcake Creations is a great blog if you are interested in fine foods, creative DIY projects, and photography tutorials. Explore the site using the labels on the right. Be sure to leave a comment or "follow" and you will absolutely brighten my day!!!

Saturday, January 14, 2012

Photography for Beginners: Histograms and EXIF Data

My motto today is: BE EXPOSED! I will talk a little about over exposure and under exposure and why you should be just plain exposed!

I want to briefly teach about histograms and EXIF Data.
Histograms are the funny graph (as shown in the image to the right) and EXIF Data is an important tool to review the settings used in any image taken.

Bearcake Creations is a great blog if you are interested in fine foods, creative DIY projects, and photography tutorials. Explore the site using the labels on the right. Be sure to leave a comment or "follow" and you will absolutely brighten my day!!!


Histograms:
While playing with my camera features, I discovered this weird graph within the display mode - the location varies based on your camera. I looked into it and learned this is called a Histogram. The purpose of this graph is to assist in creating a perfectly exposed picture.This means your photos are not too dark (under exposed) or too light and washed out (over exposed). The program running your histogram processes the amount of black and white pixels.
It graphs the tones in your image from black (on the left) to white (on the right). The left is black - this means that if the image is spiking on the left side, there are a lot of black pixels and the photo will look under exposed and dark. Conversely, if the histogram spikes on the right side your picture will be washed out and over exposed. The ideal histogram is for a small spike in the middle tapering off evenly to the left and the right.

Fun Fact: According to my new favorite photography blog (sited below), this feature is not exact. Do not entirely depend on this feature to create the perfect image but more as a frame of reference.

EXIF Data:
I am excited to use this feature as I learn more about photography. EXIF Data, which stands for ‘Exchangeable Image File’ data. This is how data is stored with each picture you take - for example the ISO, Shutter Speed, Aperture and even the type of camera used! Accessing this information is important for me because if I take a great photo I can always go back and see which settings were used.

I will explain how to access this information using a regular PC.
Open the file where you saved the picture in your computer.
Before opening the image, right click on the picture and select "Properties"
Select the "Details" tab at the top.

Enjoy exploring your new data!

If you want to access it with your camera and memory card or using a MAC computer, simply click on the sited link for further information.

Bearcake Creations is a great blog if you are interested in fine foods, creative DIY projects, and photography tutorials. Explore the site using the labels on the left and be sure to attach your email and "follow" if you want to brighten my day!

Fantastic Resources:
To gain a greater understanding of these concepts and see the work I have sited all throughout this post (as well as most pictures), visit the site below. It will teach each concept in a much more detailed lesson and has tons more to offer.

http://www.digital-photography-school.com/understanding-histograms

http://www.digital-photography-school.com/using-exif-data

Photography for Beginners: ISO, Shutter Speed and Aperture

I have been told that when learning, typically people retain 10% of what they are taught. However, if you reteach the idea, you retain 90% on the information. Therefore, I have selfishly decided to dedicate some of this blog to photography for beginners.
My birthday is coming up and my wonderful husband bought me a "fancy" camera (used on Amazon for super cheap!!). I got it a few days ago and after getting bored taking extremely amateur photos I decided to learn about the new features I have.

Tonight I have learned about ISO, Shutter Speed, and Aperture. Three words I had never heard before an hour ago. If you are an addict to "auto" mode on your camera, this post is not for you. However, if you want to learn and experiment with new features, learn away!

Turn your camera off auto mode and start taking pictures!

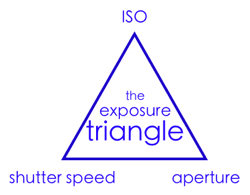
ISO, Shutter Speed and Aperture work together to create a great image in regards to exposure and lighting. These three concepts are interdependent: if you change one, it will affect the others. Hence, "The Exposure Triangle." 
Cheesy Metaphor:
Imagine your camera is like a window with shutters that open and close.

Aperture is the size of the window. If it’s bigger more light gets through and the room is brighter.

Shutter Speed is the amount of time that the shutters of the window are open. The longer you leave them open the more that comes in.

Now imagine that you’re inside the room and are wearing sunglasses (hopefully this isn’t too much of a stretch). Your eyes become desensitized to the light that comes in (it’s like a low ISO).

There are a number of ways of increasing the amount of light in the room (or at least how much it seems that there is. You could increase the time that the shutters are open (decrease shutter speed), you could increase the size of the window (increase aperture) or you could take off your sunglasses (make the ISO larger). - This metaphor (including the picture) is from the website linked at the bottom of this post. For more detailed information, refer to it.


ISO in Digital Photography: 
In short, changing ISO will impact the amount of light and graininess of the shot. Normal ISO is 100. If you take picture with say 1600 ISO, it will be grainy and more bright. Conversely, if you take a picture with lower ISO, say 80, it will be darker and smoother. 

Fun Fact: Graininess, Noise and Pixelation all mean the same thing: whether the image looks blocky. "A lot of noise" just means the picture is pixelated.

Shutter Speed in Digital Photography:
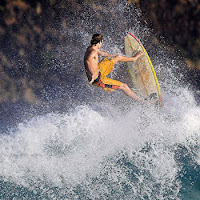
As you may guess, this just means the amount of time the shutter is open. Shutter speed is extremely important when taking motion into consideration of a picture. If you are watching someone play a sport and want a still shot without the blurriness of motion, then you need to have a quick speed. However, if you are looking for the presence of motion (if you want to take a picture of a water fall to show the flow) then you will have a slow speed. Remember, if you slow the shutter speed down, you should use a tripod so the likelihood of unwanted blur from camera shaking is avoided.

Fun Fact: Shutter Speed is always measured in seconds. More commonly it is measured in fractions of seconds such as 1/30 which is much slower than 1/1000.

Images Below: The left is FAST shutter speed. The right is SLOW shutter speed.


Aperture for Digital Photography:
Aperture helps turn a one dimensional picture into a multi-dimensional masterpiece. More simply, it is the size of the opening in the lens when a picture is taken. The depth of focus is key to understanding aperture.

Fun Facts: 
  • Aperture is measured in f-stops which are expressed like: "f/number". THINK BACKWARDS! The smaller the number, the larger the opening. f/2.8 is much MUCH larger than f/22. And therefore, f/2.8 will let in much more light. 
  • "Moving from one f-stop to the next doubles or halves the size of the amount of opening in your lens (and the amount of light getting through)" (See Attached Link for More)

Remember: "A change in shutter speed from one stop to the next doubles or halves the amount of light that gets in also – this means if you increase one and decrease the other you let the same amount of light in – very handy to keep in mind)." (See Attached Link for More)

Depth of Field (DOF):
The depth of field is the "amount of your shot that will be in focus.  
Large depth of field means that most of your image will be in focus whether it’s close to your camera or far away" (See Attached Link for More). 
Small (or shallow) depth of field "means that only part of the image will be in focus and the rest will be fuzzy" (See Attached Link for More).

Remember: Small DOF means small aperture. Large DOF means large aperture.

Images Below: 
The left image has a large DOF and a large aperture. Therefore, it is all in focus.
The right image has a small DOF and a small aperture. Therefore, just the front flowers are in focus.


To gain a greater understanding of these concepts and see the work I have sited all throughout this post (as well as most pictures), visit the site below. It will teach each concept in a much more detailed lesson and has tons more to offer.

http://www.digital-photography-school.com/digital-photography-tips-for-beginners 


Bearcake Creations is a great blog if you are interested in fine foods, creative DIY projects, and photography tutorials. Explore the site using the labels on the right. Be sure to leave a comment or "follow" and you will absolutely brighten my day!!!